Form Personalizatin In Oracle :
How do I enable Forms Personalizations?
Enable the personalizations using the Help/Diagnostics menu.
What are the various components of Forms Personalizations?
Different components of Oracle Forms Personalizations are listed below. You begin with recognizing which Triggers/Events that you wish to trap and under what conditions. The condition can be entered using the syntax as defined in the picture below.
What does the Action Tab do?
Here you will either change form property, or display messages or enable menu etc.
Can I modify SQL Query behind the LOV using Forms Personalizations?Of course you can. In the below example I am restricting the LOV to less than 3records by introducing where rownum <3 in record group query.
Step 1. Create a new record group
Step 2. Attach the newly created record group to existing LOV in EBS Form.
Can I call a PL/SQL Stored procedure passing it form field variables?
Yes, using the syntax below.
Note: You can also invoke FORMS_DDL built-in to perform DDL.
Can I call BuiltIn's?
Indeed, as shown below, you can pick from all the form built-in's as below.
You can also call a form function and pass it parameters using Forms Personalizations
Processing can be aborted if validation were to fail
You can invoke equivalent to app_item_property.set_property.
I am displaying the Required property below, however you can use this option for all supportable properties of app_item_property
You can initialize a global variable. Initialization code is executed if and only if the global variable does not already exist.
Use global variables for passing variables back and forth between two forms.
Please do not use Global Variables if your logic is restricted to a Single form itself.
You can assign values to form fields using global variable.
Using forms personalizations, you can set the Default where clause of the BLOCK too.
Note: Don't forget to reset this clause after your desired operation has been finished. This will facilitate the form to run in standalone mode too.
Ditto for Order by Clause on block.
For displaying messages, you can either enter a plain text, or your message can be displayed from the result of a SQL Statement.
Local variables can be defined and they will be active for throughout the session of the current form.
Use global variables if you wish to share the variable between multiple forms.
Below, just for demo, I am setting the local variable to 0.
In the below picture, I am checking if local variable is 0 then display a message.
You can enable SPECIAL1-15 or MENU1-15, to create new menu entries under the Tool menu.
As seen below, the above two setups have instantiated the new Menu Items
SPECIAL16-30 will create entries under Reports menu
SPECIAL31-45 will create entries under Actions menu
You can capture the click on those newly created menu items by trapping event MENU1 or SPECIAL1 [or whatever you defined]
Some More BASIC FORM PERSONALIZATION
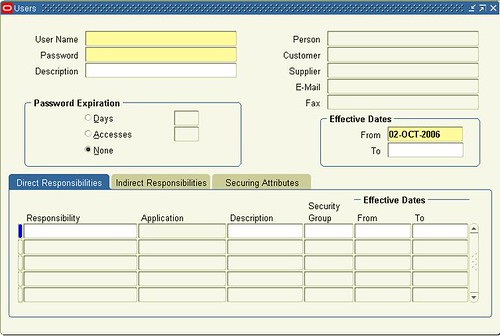
For this example, we will define a basic Forms Personalization by hiding the Person, Customer and Fax fields of the User form. Follow the following steps.
Responsibility: System Administrator
1 - Ensure to set system profile 'Hide Diagnostics menu entry' to 'No' and 'Utilities:Diagnostics' to 'Yes' at the user level.
2 - Open the Users form. (N) Security > User > Define.
3 - This is the basic Users form as shown here:
4 - From the menu, select (M) Help > Diagnostics > Custom Code > Personalize.
5 - If some Rules are already defined in the Users form, you will see them this window (as in this example).
6 - Add a new Rule by selecting (M) File > New.
7 - This is the Form Personalisation form and it's Rules already defined. We will be adding seq. 40.
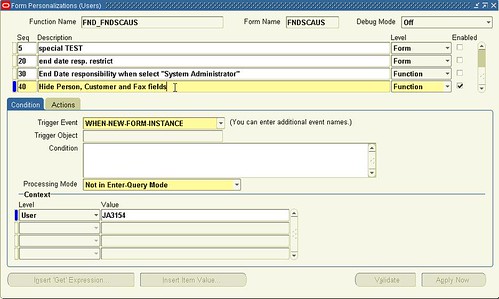
A - Rules Seq.: 40
B - Description: Hide Person, Customer and Fax fields
C - Trigger Event: WHEN-NEW-FORM-INSTANCE
D - Context or Scope: Set at User level and enter your user in the Value field
E - Select the Actions tab. This is the Actions tab of Rule seq. 40
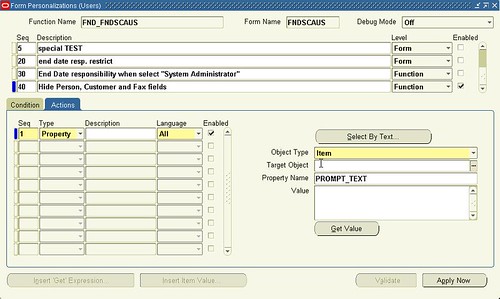
F - Action Seq.: 1
G - Type: Property
H - Object Type: Item
I - Select the Select By Text button
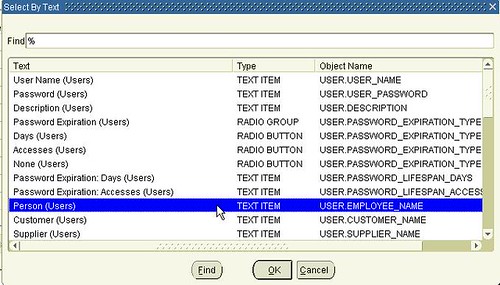
J - Select the Person (Users) item from the LOV
K - Property Name:
L - Value: False
M - Save your work
N - When you are done, it should look like this:
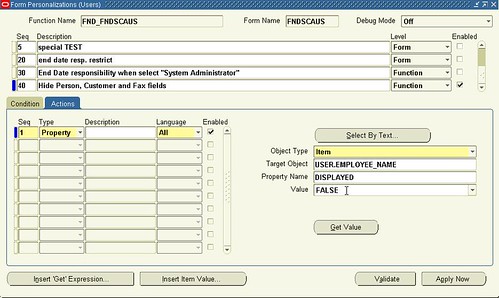
O - Repeat Steps F to L for the Customer and Fax items. Save all of your work. It should now look like this:
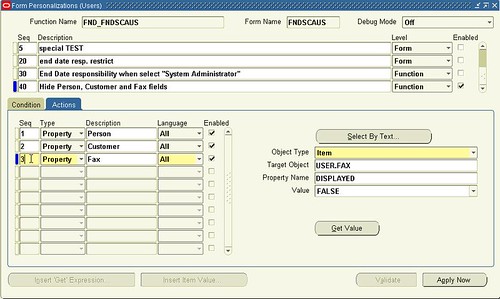
P - Close the Form Personalization form, close the User form and reopen it. Your User form should now look like this: Notice that the User, Customer and Fax fields are no longer displayed.
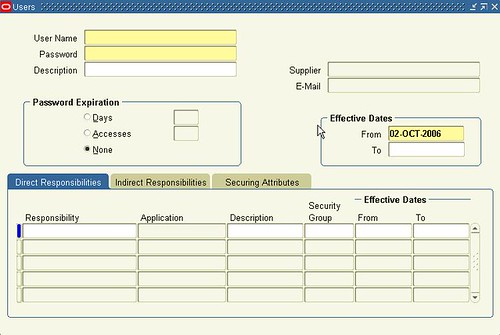
Hope this Information is Usefull
Form Personalization work with flex, ejem:
ReplyDeletePO_HEADERS.ATTRIBUTE6
ENABLE(APPLICATIONS_COVER)
FALSE
I can't see the first images, please fix the :)
ReplyDelete