Procure To Pay Cycle in Oracle Apps R12 (P2P Cycle)
Procure To Pay Cycle in Oracle Apps R12 (P2P Cycle)
Here in this post, I tried to explain the steps involved in Procure to Pay Cycle. This is a pure functional Stuff and helps you to understand the navigation steps.
I tried to keep as simple as Possible for clear understanding. The screenshots given below are taken from R12.1.1 apps instance.
Stage 1: Choosing an Item
Let us choose an item to be procured in our example.
Go to Purchasing Responsibility and follow the below navigation to check for the suitable item.


The item picked for our example should be purchasable item as above. Click on tools and choose “Categories” to view the below screen.

Stage 2: Creation of Requisition
Follow the below Navigation to reach Requisition Form.

Create a new Requisition for the item viewed in Stage 1.

Click on Distributions to View the charge Account.

Save and Submit for Approval

Now note down the Requisition number and open the “Requisition Summary Form” to view the status of it. For our Example, Requisition number is: 14855
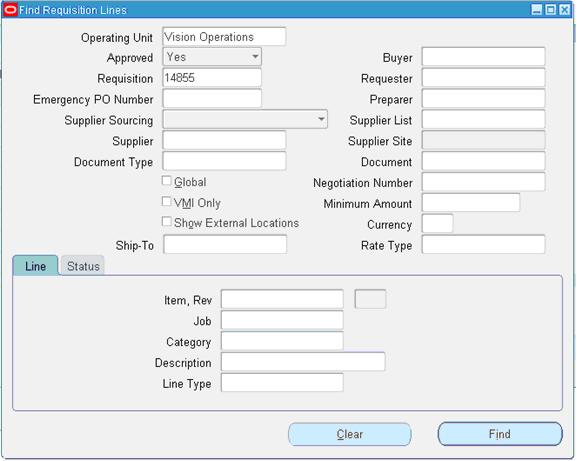
Stage 3 : Checking the Status of Requisition

Query for the Requisition Number and click Find.

Here for our example purpose, I kept the submitted and approved person has same and hence it shows the status as approved.

To see the approval status, please follow the below navigation.


Stage 4 : Creation of Purchase Order
For creating a Purchase order, let us use the “Autocreate Documents” Form. Follow the below Navigation

Query for the Requisition
Click on Automatic as shown in the above figure to create a Purchase Order

Click on “Create” button to create a Purchase order


View the shipment screen to change the “Match Approval Level” to “2-Way”.

Click the “Receiving Controls” to make sure that the “Routing” is made as “Direct Routing”

Click Save and submit for Approval.


Note down the PO Number.
Stage 5: Creation of Receipts

Query with the Purchase order created in the above stage.

Check the check box near to the lines that are received and click save.

Click the “Header Button” to view the Receipt Number.

Stage 6: Checking the On Hand

Query for our Receipt and make sure the Organization is the same as we received.

Below screen will show that our inventory has been increased by 5 quantities.

Stage 7: Check the Material Transactions
Follow the below Navigation to reach “Material Transactions” Form
Query for the item and date as below
Below screen shows the source and transaction Type
Below screen shows you the Serial Numbers of the items received.
Stage 8: Creation of Invoice
Navigate to any Purchasing Responsibility and view à Requests
Submit the below requests by providing the Receipt number as Parameter to create an invoice.

Check the status of the program.

Stage 9: Checking the Invoice
Change to any Payables Responsibility and open the invoices Form.
Query for the Purchase order as below,


Below screenshot will give you the status of the invoice

Stage 10: Creation of Accounting and Payment
Once invoice got approved, we can “Create Accounting” and “Create Payments” via “Action” Button in the “Invoice Form” as we validated the invoice.
Thus the brief description of P2P cycle came to end.
Thus the brief description of P2P cycle came to end.
changes in 11i and R12 in P2P cycle
Procure to Pay
- Oracle Purchasing: You enter Suppliers of different materials and products you want to purchase to manufacture a finished good that your organization plans to sell.
- Oracle Purchasing: You prepare a Request for Quotation (RFQ) and send it to different suppliers to get the best and/or economical price for the product.
- Oracle Purchasing: Suppliers sends their quotations and you upload those quotations in Oracle Purchasing to get the best three quotes and further to get the one best quote.
- Oracle Purchasing: You prepare a Purchase Order(PO) against the best RFQ to buy the goods from the supplier who quoted the suitable price and sends the PO to that supplier
- Oracle Purchasing: The supplier receives the confirmation of purchase from PO and ships the ordered goods. You receive the goods enter aGoods Received Note (GRN) in Oracle Purchasing.
- Oracle Inventory / Oracle Assets: It’s up to you whether you want to receive the goods at your head office or you Inventory directly. In either case you move the received goods to your different Raw Material Inventory from Oracle Purchasing to Oracle Inventory and the Item Count increases. If the item is Asset Type then it will move to Oracle Assets at the time of Invoice creation in Oracle Payables.
- Oracle General Ledger: Once you move the goods to Oracle Inventory, it sends the Material Accounting to Oracle General Ledger.
- Oracle Payables: After this the supplier sends you the invoice for the purchased goods and you Enter or Match the invoice against the PO from Oracle Purchasing in Oracle Payables. As said before, if the item is Asset in nature then it will move to Oracle Asset.
- Oracle General Ledger: When you enter the invoice it means that you have created a Liability against that supplier and also you have recorded the expense incurred or asset purchased. Oracle Payables sends the invoice accounting to Oracle General Ledger.
- Oracle Payables: You pay the invoice and settle the Liability.
- Oracle General Ledger: The liability is settled and your cash movement account is updated.
- Oracle Cash Management: As you pay the invoice Oracle Payables sends the payment information to Oracle Cash Management for Bank Reconciliation. Once reconciled, Oracle Cash Management sends the updated Bank/Cash accounting entry to Oracle General Ledger.
- Oracle General Ledger: Your cash at bank is updated with actual balance.
- Oracle Process Manufacturing(OPM) / Oracle Discrete Manufacturing(ODM): You start the manufacturing of your final product. Both OPM or ODM requests the different raw materials from your inventory organizations and manufactures a finished good.
- Oracle Inventory: As the raw materials are issued to OPM and ODM the inventory sends the issuing material accounting to General Ledger and decreases the Item Count from the Raw Material Store. As the finished good is prepared, Oracle Inventory receives the finished good in Finished Good Store and increase the Item Count.
This is excellent explanation!
ReplyDeleteThanks
This article is too good ..it's very heplful..thank u so much
ReplyDelete
ReplyDeleteI feel really happy to have seen your webpage and look forward to so many more entertaining times reading here.Same as your blog i found another one Oracle Fusion Financials.Actually I was looking for the same information on internet for Oracle Financials Cloud and came across your blog. I am impressed by the information that you have on this blog. Thanks once more for all the details.