| Oracle Process Manufacturing Process Execution User's Guide Release 12.1 Part Number E13652-05 | Contents | Previous | Next |
Batch Production
This topic provides procedures for releasing and unreleasing a batch. Procedures are presented for editing batch steps in production, editing resource transactions, and recording batch operation work in process. The procedure for checking lot status when yielding product presents the business rules that are enforced when yielding batch material into an existing lot. You are given an understanding of and procedures for incremental backflushing. Discussions of activity factors and charges are provided to enhance your understanding of how these are used in the Oracle Process Manufacturing Process Execution application.This chapter covers the following topics:
- Requirements
- Releasing a Batch
- Unreleasing a Batch
- Releasing a Batch Step
- Unreleasing a Batch Step
- Checking Material Status When Consuming Ingredients
- Checking Lot Status When Yielding Product
- Understanding Incremental Backflushing
- Calculating Resource Usage for an Incremental Backflush
- Performing Incremental Backflushing
- Editing Batch Steps in Production
- Understanding Charges
- Using Operation Charge Step Dependencies
- Calculating Charges for Dependent Steps
- Understanding Activity Factors
- Editing Resource Transactions
- Recording Batch Operation Work in Process
Requirements
Following are some requirements that customers have for batch production in Process Execution:Does the application keep inventory current for ingredients that are consumed incrementally in the production cycle?
Yes. Incremental backflushing provides a convenient method to keep inventory current for batches that consume ingredients incrementally throughout the time production occurs. Incremental backflushing is used to model continuous flow type production.Keep Inventory Current with Incremental Backflushing
Incremental backflushing provides a simple method to record ingredient consumption and production yield as it occurs prior to batch completion. Incremental backflushing enables the timely entry of material transactions of ingredients for batches with a status of WIP, and eliminates the need to enter ingredient consumption quantities.
Does the application show batch production progress at a glance?
Yes. The Process Execution Workbench window provides a consolidated view of batch products, byproducts, ingredients, and steps. You can also view the batch progression from the Batch Details window by choosing Batch Progression from the Tools menu. If you install the Oracle Manufacturing Execution System for Process Manufacturing application, then this option is available.Totally Integrate Batch Process Management
The Oracle Process Manufacturing Process Execution application manages the total batch production process from the material and nonmaterial resources. The Process Execution Workbench window displays batches in a single consolidated view. This allows viewing products, byproducts, and ingredients at both a summary level and at the individual step level.
Releasing a Batch
The Release Batch dialog box lets you enter a date for releasing a batch for production.The application checks for the validity of the batch validity rule, and advises you, if the actual start date entered in the dialogue is outside the validity rule date range. The application checks for ingredient reservations to create transactions. If inventory shortages exist, then those ingredients are reported as exceptions. Solve these exceptions by manually specifying transactions or proceed with the release. If there are move orders in the inventory organization, then the move orders appear as exception if Autoconsume from Supply Subinventory parameter is set to Yes. It also checks for unexploded phantoms, except for those that are Automatic by Step with a step association. If unexploded phantoms are found, then you can explode the phantoms before releasing the batch. At this point, the application releases batches recursively, and consumes materials as follows:
-
For a production batch or a laboratory batch with Update Inventory
indicator set to Yes, the application checks lot status and expiration
dates, checks for inventory shortages, completes transactions, consumes
the ingredients marked for autoconsumption, and updates the WIP planned,
planned and actual quantities.
-
For a laboratory batch, with the Update Indicator set to No, the
application updates the WIP planned quantity to the planned quantity for
all materials, and then updates the actual quantity of ingredients to
the planned quantity.
-
Batch status is set to work in process.
- An actual start date is assigned to the batch.
Prerequisites
- Create a batch.
To release a batch:
-
Navigate to the Batch Details window.
-
Query the batch Document to release.
-
Choose Release from the Actions menu.
-
Enter the Actual Start Date for the batch.
-
Click OK.
Unreleasing a Batch
Once a batch is released, you can to revert its status from Released to Pending. Completed transactions are reversed, actual values are reset to zero, and inventory is updated.Prerequisites
- Create and release a batch.
To unrelease a batch:
-
Navigate to the Batch Details window.
-
Query the batch Document to unrelease.
-
Choose Unrelease from the Actions menu.
-
The following message displays:
Do you want to recreate reservations for ingredients and pending product lot records?
Click Yes to unrelease the batch and recreate reservations and pending product lot records from the transaction which is reversed or Click No to unrelease the batch without recreating reservations.
-
The batch Status returns to Pending.
Releasing a Batch Step
The Release Batch Step dialog box lets you enter a date for releasing a batch step. You can release a step even if the batch is pending.Prerequisites
- Create a batch.
To release a batch step:
-
Navigate to the Batch Steps window.
-
Query the batch Document containing the step to release.
-
Select the Step.
-
Choose Release Step from the Actions menu.
-
Enter the Actual Start Date.
-
Click OK.
If the application finds ingredients associated with the step that have a consumption type of Automatic by Step and are not fully transacted, then the application consumes the ingredients and creates transactions. Refer to "Transacting Materials" for more information on material transactions
The step status changes from Pending to WIP.
Unreleasing a Batch Step
Once a batch step is released, you can revert its status from Released to Pending. Completed transactions are reversed, actual values are reset to zero, and inventory is updated.Prerequisites
- Release a batch step.
To unrelease a batch step:
-
Navigate to the Batch Steps window.
-
Query the batch Document containing the step to unrelease.
-
Select the Step.
-
Choose Unrelease Step from the Actions menu.
-
The following message displays:
Do you want to recreate reservations for ingredients and pending product lot records associated to this step?
Click Yes to unrelease the batch step and recreate reservations and pending product lot records from the transactions which are reversed or Click No to unrelease the batch step without recreating reservations.
The step status changes from WIP to Pending.
Checking Material Status When Consuming Ingredients
Material status control specifies whether a transaction for a portion of inventory is allowed or disallowed. While the item status is associated with a particular item, material status is related to the particular instance of the item. Material status control makes it possible to control the movement and usage of portions of on-hand inventory that might have distinct differences because of grade, quality, or maturity level. Material status can be defined at the subinventory, locator, lot, and serial level. Refer to the Oracle Inventory User's Guide on setting up Material Status codes.If the material to consume has a status that is not usable for production and does not allow a WIP issue transaction, then you cannot consume it.
Warning When Consuming Ingredients with Negative Inventory
If you try to consume an ingredient without inventory, then the following caution displays:"Quantity will drive inventory negative."
Checking Lot Status When Yielding Product
If the existing quantity has a status different from the default status for the item, then the inventory organization parameter Allow Different Lot Status is used to prevent yielding an additional quantity of a lot into a specific location.Warning When Yielding Batch Material into an Existing Lot
Use the inventory organization parameter Allow Different Lot Status to prevent yielding a lot into a location where the lot already exists, but has a status different from the item default status:-
Set to No, the parameter prevents the yield transaction from being
saved. The application displays an error message indicating that the lot
already exists in the target location and that it has a status
different from the default status.
-
Set to Yes, the parameter lets the yield transaction retain the status of the material already in the target location.
- Set to Yes With Exception, the parameter allows the yield transaction to be saved only if the on-hand balance of the lot in the target location is 0. In this case, the quantity yielded assumes the default status for the item.
Warning When Editing or Reversing Batch Material Transactions
Editing product yield can drive inventory negative. For example, if 100 kg of material is yielded into a location, subsequently moved to a different location, and you edit the original yield transaction from 100 kg to 90 kg, then a balance of -10 kg is posted.The inventory organization parameter Allow Negative Balances determines whether or not inventory transactions drives the inventory balance of an item negative and warns you when editing or reversing product or byproduct yield:
-
Set to No, if the change to the product or byproduct yield quantity
drives inventory negative, then an error message displays and you cannot
save your work.
- Set to Yes, you can save without warning or error.
Rechecking Negative Inventory and Lot Status When You Save
There is a possible delay between the entry of a transaction and the actual processing of the transaction as you save your work. The application rechecks the inventory balances when you save your work. An appropriate response displays depending on the settings previously described for the Allow Different Lot Status and Allow Negative Balances parameters.Understanding Incremental Backflushing
Incremental backflushing lets you record production output or yield incrementally as it occurs prior to batch completion. The application calculates the ingredient usage by backflushing the ingredients based on product yield and WIP planned quantities. Set the Process Execution parameter Incremental Backflush Factor to calculate the incremental backflush factor as a ratio of incremental quantity of an item to WIP planned quantity of a single product or total WIP planned quantity of all products. Refer to " Setting Up Parameters" for more information on setting up Process Execution parameters.Incremental backflushing can only be performed on batches with a status of WIP or Completed. Items must have a consumption type of Incremental to be backflushed by incremental backflushing.
With incremental backflushing, the application calculates actual quantities for the items set to a consumption type of incremental in a WIP batch. The application calculates the quantity to be backflushed for each incremental type material, but does not enforce the complete transaction of the quantity. The application displays the Material Exceptions window if the calculated quantity is not transacted, but you can ignore that and complete incremental backflushing process. Calculations are proportional to the quantity of the item selected for incremental backflushing. The following example illustrates how this works as new incremental quantities of a product are entered. The batch formula used for the illustration consists of three items that have manual and incremental consumption types. Both Proportional and Fixed contributing to yield scale types are shown.
| Item | Type | Scale Type | Quantity |
|---|---|---|---|
| Product 1 | Manual Yield Type | Proportional | 100 |
| Ingredient 1 | Incremental Consumption Type | Proportional | 90 |
| Ingredient 2 | Incremental Consumption Type | Fixed Contributing to Yield | 2 |
| Ingredient 3 | Manual Consumption Type | Proportional | 8 |
| Item | WIP Planned Quantity | Actual Quantity |
|---|---|---|
| Product 1 | 100 | 0 |
| Ingredient 1 | 90 | 0 |
| Ingredient 2 | 2 | 0 |
| Ingredient 3 | 8 | 0 |
When you accept the incremental backflushing, batch quantities become:
| Item | WIP Planned Quantity | Actual Quantity |
|---|---|---|
| Product 1 | 100 | 10 |
| Ingredient 1 | 90 | 9 |
| Ingredient 2 | 2 | 2 |
| Ingredient 3 | 8 | 0 |
The quantity of Ingredient 1 is calculated without considering the scalability of other items in the batch or whether the consumption type of other items is Incremental.
For nonscalable, incremental items, the application consumes the full WIP planned quantity the first time you perform an incremental backflushing. The actual quantity of Ingredient 2, therefore, is calculated as 2, and not 0.2.
Ingredient 3 has a consumption type of Manual. Its quantity is not affected by the incremental backflushing. Manually enter the actual quantities for items with a Manual consumption type.
If one unit of Ingredient 1 was lost through a spill, and the quantity consumed was actually 10 instead of 9, then adjust this quantity on the Batch Details windows. The new batch quantities become:
| Item | WIP Planned Quantity | Actual Quantity |
|---|---|---|
| Product 1 | 100 | 10 |
| Ingredient 1 | 90 | 10 |
| Ingredient 2 | 2 | 2 |
| Ingredient 3 | 8 | 0 |
When you perform another incremental backflushing of 10 units of Product 1, batch quantities adjust as follows:
| Item | WIP Planned Quantity | Actual Quantity |
|---|---|---|
| Product 1 | 100 | 20 |
| Ingredient 1 | 90 | 19 |
| Ingredient 2 | 2 | 2 |
| Ingredient 3 | 8 | 0 |
Each time an incremental backflushing is performed, the application creates completed transactions for the incremental quantity. Look at the transactions for Ingredient 1, assuming for the moment that it is neither lot-controlled nor location-controlled, then you see the following:
| Status | Quantity | Comment |
|---|---|---|
| Complete | 9 | From the first incremental backflushing |
| Complete | 1 | From the manual adjustment |
| Complete | 9 | From the second incremental backflushing |
Reserving Ingredients for Incremental Backflushing
If any of the ingredients with a consumption type of incremental are lot-controlled or locator- controlled, and you enter reservations before the incremental backflushing, then the application attempts to consume the additional actual quantity from those reservations automatically. For example, if Ingredient 1 in the previous example were lot-controlled, and 30 units were reserved from each of three lots before the first incremental backflushing, when you perform the incremental backflushing, then the application consumes all nine units from the first lot reserved.Similarly, if the product were lot-controlled or locator-controlled, and a pending product lot record was created before the incremental backflushing, then the application automatically yields into the lots in the same order that they were given out to the Pending Product Lots window. The application does not create new reservations with incremental backflushing. It consumes ingredients from already existing lot reservations.
For lot-controlled or locator-controlled items, the application determines the lot or locator for the full incremental quantity. This is required because all completed transactions for lot-controlled items must specify a lot. If this were not required, then the on-hand balances would not reflect the current total on-hand inventory. If there is insufficient quantity in reservations or pending product lots to consume from or yield into when an incremental backflushing is performed, then the Material Exceptions window displays the exception quantities. You can proceed with incremental backflushing without solving the exceptions.
You can also adjust quantities downwards by entering a negative incremental quantity or a new actual quantity that is less than the current actual quantity. If actual quantities are reduced through incremental backflushing, then the application recreates reservations.
Incremental Backflushing Scenarios
The following two scenarios show how to use incremental backflushing in a situation where the full planned quantities of the product and ingredients are reserved and when product lots are not reserved.Full Planned Quantities of Product and Ingredient Reserved
The planned quantity of the ingredients is reserved and the planned quantity of products is entered in the Pending Product Lots window before the batch is run. The following are the steps in this scenario:-
Create a batch.
-
Reserve the planned quantity of the ingredients.
-
Enter the planned quantity of the product in the Pending Product Lots window.
-
Release the batch.
-
Each time you record a new quantity of the product yielded by the
batch, enter it on the Incremental Backflushing window. Enter an
incremental quantity, the new actual quantity, or the percent of planned
quantity produced until the time of making the entry.
-
Click OK to save the batch with the actual quantity updated for the
product and ingredients, and the quantities are consumed from the
existing reservations.
- When the batch is finished, choose Complete from the Actions menu on the Batch Details window.
Product Lots Not Reserved
The planned quantity of the ingredients is reserved before the batch is run, but the product is not reserved. Each time a new lot of the product is yielded, the lot number and quantity produced is reported. The following are the steps in this scenario:-
Create a batch.
-
Reserve the planned quantity of the ingredients.
-
Release the batch.
-
Each time a lot of the product is yielded, enter the new lot and
quantity on the Pending Product Lots window available from the Batch
Details window.
-
Click Generate Lot to generate a new lot number.
-
Click OK on the Pending Product Lots window. Return to the Batch Details window.
-
Choose Backflush from the Actions menu on the Batch Details window.
The Incremental Backflushing window displays the new actual quantity and
the incremental quantity entered for the new lot.
-
Click OK to redisplay the Batch Details window. Note the actual quantity of the ingredients is backflushed.
-
Save the batch.
- When the batch is complete, choose Complete from the Actions menu on the Batch Details window.
Incrementally Backflushing Phantom Ingredients
If you perform incremental backflushing on a parent batch that contains phantoms, then ingredients in the phantom batches that have an incremental consumption type are also backflushed.Scaling Phantoms
If you manually edit the actual quantity of an incremental release phantom ingredient in the parent batch, then you can scale the phantom batches. This is no different from editing the quantity of a nonincremental phantom, as all items in the phantom batch are scaled.Changing the Yield Type After Incremental Backflushing
If you change the yield type of a product or byproduct to Incremental after you perform incremental backflushing, then the product with a yield type change is updated by any future incremental backflushing. Its percent of plan, however, is not the same as the percent of plan of the other Incremental items. This happens as a result of the incremental scale factor being applied during incremental backflushing. You can change the consumption/yield type of material only in a pending batch.For example, you perform incremental backflushing for 50 percent of the planned quantity of an item. The Incremental release items are updated so that their actual quantity is 50 percent of their planned quantity. If you change the yield type of the product from Automatic release to Incremental release, and you perform another incremental backflushing for an additional 10 percent of the item driving incremental backflushing, then 10 percent of the planned quantity is added to the actual quantity of all Incremental items in the batch. Therefore, the items that had an Incremental release before any changes were made, have an actual quantity equal to 60 percent of their planned quantity, while the product that just had its yield type changed has an actual quantity equal to only 10 percent of its planned quantity.
Adjusting Actual Quantities After Full Completion
Incremental backflushing allows you to adjust actual quantities after batch completion.Calculating Resource Usage for an Incremental Backflush
Resource usage can be calculated for a step in work in process status and driven by ingredient consumption when the Automatic Step Quantity Calculation (ASQC) option is selected, and the Calculate Interim Resource Usage parameter is set to Yes. You can calculate resource usage for an associated step and the resource usage for prior dependent steps. Refer to "Using the Calculate Interim Resource Usage Parameter" for more information on this parameter.To backflush resource usage based on product yield, use the incremental backflushing functionality without ASQC selected, and the Backflush Resource Usage parameter set to Yes. Performing an incremental backflush on a product that is associated to a step records the resource usage proportionally when this parameter is set to Yes.
Step Dependency Impact
If the dependency is start-to-start, then the ratio calculated from incremental backflush is applied to the step, and to the resource. If the dependency is finish-to-start, then the step is considered complete, and the usage and quantities are calculated at 100 percent of the plan. If a preceding dependent step is completed, then it remains unchanged.Implementation Considerations
-
If the product is set to the incremental or manual yield type and
the yield was not completely recorded using incremental backflushing,
then when the batch is completed, these materials display in the
Material Exceptions window. You can record the remaining yield. Because
this is a manual process and not done through incremental backflushing,
the resource usage is not backflushed.
-
Only the step associated to the product that incremental
backflushing is initiated from and all its dependent preceding steps
have the usage backflushed.
-
If the product that incremental backflushing is initiated from is
not associated to a step, then a resource usage is not backflushed.
-
ASQC must be set to Off. The Calculate Step Quantities indicator on the recipe header must be deselected.
-
If an associated step or any dependent step is not completed, then
the usage is not backflushed. This extends to completed batches where it
is possible to initiate incremental backflushing for materials, but
does not affect the resource usages.
- To use incremental backflushing on the product, it is a requirement that the yield type of the product must be Manual or Incremental.
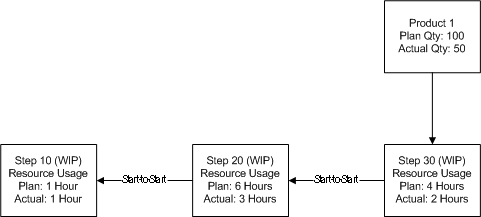
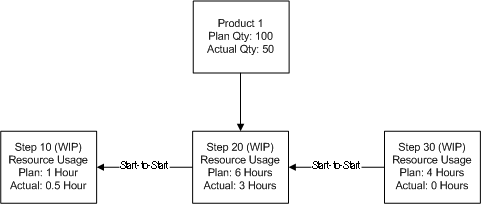
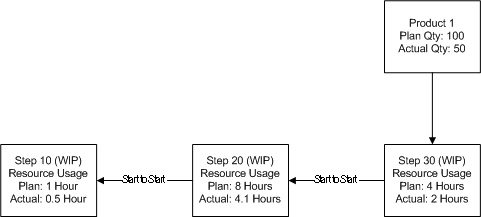
Example 1: Impact of Incremental Backflushing on Start-to-Start Step Dependency
Product 1 is associated to step 30, has a plan quantity of 100, and 50 are produced. An incremental backflush is performed on Product 1. All step resources are calculated at 50 percent.Following is a table of the step dependencies, plan resource usage, and actual resource usage:
| Step and Status | Dependency | Dependent on Step | Plan | Actual |
|---|---|---|---|---|
| Step 10 WIP | n/a | n/a | 1 hour | 0.5 hour |
| Step 20 WIP | Start-to-Start | 10 | 6 hours | 3 hours |
| Step 30 WIP | Start-to-Start | 20 | 4 hours | 2 hours |
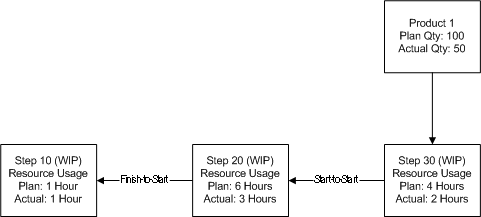
Example 2: Impact of Incremental Backflushing on Finish-to-Start Step Dependency
Product 1 is associated to step 30, has a plan quantity of 100, and 50 are produced.Following is a table of the step dependencies, plan resource usage, and actual resource usage:
| Step and Status | Dependency | Dependent on Step | Plan | Actual |
|---|---|---|---|---|
| Step 10 WIP | n/a | n/a | 1 hour | 1 hour |
| Step 20 WIP | Finish-to-Start | 10 | 6 hours | 3 hours |
| Step 30 WIP | Start-to-Start | 20 | 4 hours | 2 hours |
Following is an illustration of the previously tabulated WIP step dependencies, plan resource usage, and actual resource usage:
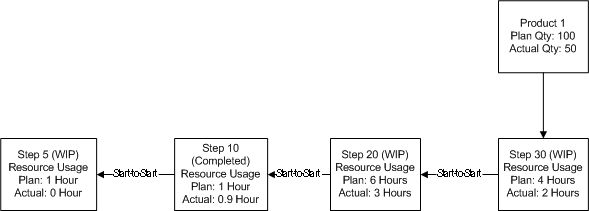
Example 3: Impact of Incremental Backflushing on a Step Prior to a Completed Step
Product 1 is associated to step 30, has a plan quantity of 100, and 50 are produced.Following is a table of the step dependencies, plan resource usage, and actual resource usage:
| Step and Status | Dependency | Dependent on Step | Plan | Actual |
|---|---|---|---|---|
| Step 5 WIP | n/a | n/a | 1 hour | 0 hour |
| Step 10 Complete | Start-to-Start | 5 | 1 hour | 0.9 hour |
| Step 20 WIP | Start-to-Start | 10 | 6 hours | 3 hours |
| Step 30 WIP | Start-to-Start | 20 | 4 hours | 2 hours |
Following is an illustration of the previously tabulated step dependencies, plan resource usage, and actual resource usage:
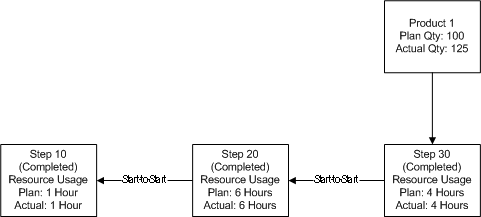
Example 4: Impact of Additional Yield on Resource Usage after Batch Completion
Product 1 is associated to step 30, has a plan quantity of 100, and 125 are produced.Following is a table of the step dependencies, plan resource usage, and actual resource usage:
| Step and Status | Dependency | Dependent on Step | Plan | Actual |
|---|---|---|---|---|
| Step 10 Completed | n/a | n/a | 1 hour | 1 hour |
| Step 20 Completed | Start-to-Start | 10 | 6 hours | 6 hours |
| Step 30 Completed | Start-to-Start | 20 | 4 hours | 4 hours |
Following is an illustration of the previously tabulated step dependencies, plan resource usage, and actual resource usage:
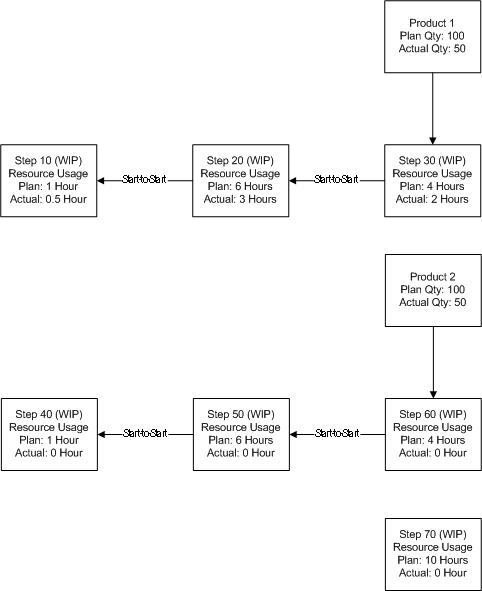
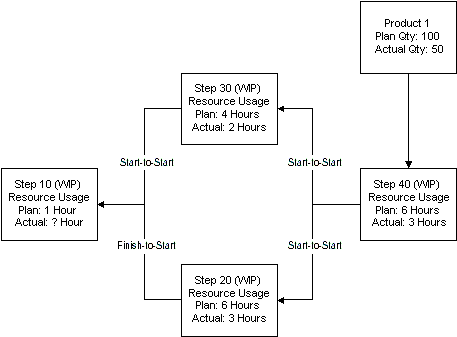
Example 5: Impact of Incremental Backflushing on Two Incremental Type Products
Product 1 is an incremental type product associated to step 30, has a plan quantity of 100, and 50 are produced. Product 2 is associated to step 60, has a plan quantity of 100, and 50 are produced. Step 70 is not associated to a material.Following are tables of the step dependencies, plan resource usage, and actual resource usage:
| Step and Status | Dependency | Dependent on Step | Plan | Actual |
|---|---|---|---|---|
| Step 10 WIP | n/a | n/a | 1 hour | 0.5 hour |
| Step 20 WIP | Start-to-Start | 10 | 6 hours | 3 hours |
| Step 30 WIP | Start-to-Start | 20 | 4 hours | 2 hours |
| Step and Status | Dependency | Dependent on Step | Plan | Actual |
|---|---|---|---|---|
| Step 40 WIP | n/a | n/a | 1 hour | 0 hour |
| Step 50 WIP | Start-to-Start | 40 | 6 hours | 0 hour |
| Step 60 WIP | Start-to-Start | 50 | 4 hours | 0 hour |
| Step 70 WIP | Start-to-Start | n/a | 10 hours | 0 hour |
In this scenario, make both products manual yield. This lets you initiate an incremental backflush on Product 1 and the usage for its associated step and dependent steps is calculated, but Product 2 and its associated and dependent steps remain unchanged. When backflushing is initiated from Product 2, Product 1 and its steps remain unchanged.
Following is an illustration of the previously tabulated step dependencies, plan resource usage, and actual resource usage:
Example 6: Impact of Incremental Backflushing on a Product with Midstream Step Associations
Product 1 is associated to step 20, has a plan quantity of 100, and 50 are produced. Step 30 is dependent on step 20.Following are steps, statuses, step dependencies, and plan and actual resources:
| Step and Status | Dependency | Dependent on Step | Plan | Actual |
|---|---|---|---|---|
| Step 10 WIP | n/a | n/a | 1 hour | 0.5 hour |
| Step 20 WIP | Start-to-Start | 10 | 6 hours | 3 hours |
| Step 30 WIP | Start-to-Start | 20 | 4 hours | 0 hours |
Following is an illustration of the previously tabulated step dependencies, plan resource usage, and actual resource usage:
Example 7: Impact of Incremental Backflushing on Fixed, Proportional, and By Charge Scaling
Product 1 is associated to step 20, has a plan quantity of 100, and 25 are produced.The batch is released.
Step 10 is released:
-
Activity 1 has a Plan Activity Factor of 1 and an Actual Activity Factor of 1.
- Activity 2 has a Plan Activity Factor of 2 and an Actual Activity Factor of 2.
-
Activity 3 has a Plan Activity Factor of 1 and an Actual Activity Factor of 1.
-
Initiate an incremental backflush on Product 1. Specify a new actual quantity of 25.
Resource Scale Type Plan Actual 1 Fixed Resource Count: 1
Process Quantity: 500
Total Usage: 1Resource Count: 1
Process Quantity: 500
Total Usage: 12 Proportional Resource Count: 1
Process Quantity: 500
Total Usage: 0.5Resource Count: 1
Process Quantity: 125
Total Usage: 0.1253 By Charge Resource Count: 1
Process Quantity: 500
Total Usage: 4Resource Count: 1
Process Quantity: 125
Total Usage: 2
Following is an illustration of the previously tabulated step dependencies, plan resource usage, and actual resource usage:

Example 8: Impact of Sequential Incremental Backflushing
Product 1 has a plan quantity of 100, and 50 are produced. This example shows an initial incremental backflush initiated on Product 1 for 50 percent of plan with a subsequent manual addition of a 0.1 hour resource transaction for step 20.Following is a table of the step dependencies, plan resource usage, and actual resource usage:
| Step and Status | Dependency | Dependent on Step | Plan | Actual |
|---|---|---|---|---|
| Step 10 WIP | n/a | n/a | 1 hour | 0.5 hour |
| Step 20 WIP | Start-to-Start | 10 | 8 hours | 4.1 hours |
| Step 30 WIP | Start-to-Start | 20 | 4 hours | 2 hours |
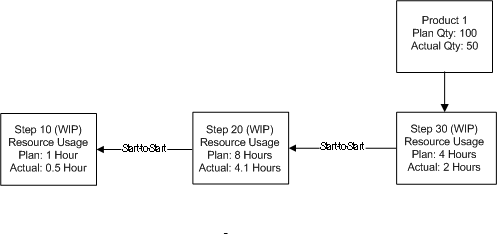
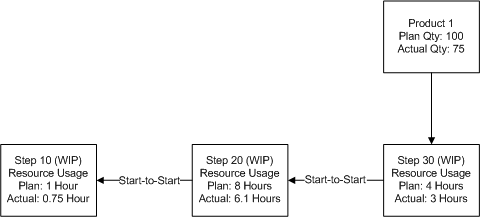
If an additional incremental backflush of 25 is performed for Product 1, then the actual usage for Step 20 retains the 0.1 hour resource transaction, and the resource usage backflush adds a resource transaction for 25 percent of the plan usage, which is calculated as 2 hours:
| Step and Status | Dependency | Dependent on Step | Plan | Actual |
|---|---|---|---|---|
| Step 10 WIP | n/a | n/a | 1 hour | 0.75 hour |
| Step 20 WIP | Start-to-Start | 10 | 8 hours | 6.1 hours |
| Step 30 WIP | Start-to-Start | 20 | 4 hours | 3 hours |
Example 9: Implementing a Negative Incremental Backflush
This example is a continuation of example 8. Product 1 has a plan quantity of 100, and 50 are produced. It shows the result of initiating an incremental backflush of -25 on Product 1. Note that the additional resource transaction on Step 20 is retained, and 25 percent of each of the plan usages is subtracted.Following are steps, statuses, step dependencies, and plan and actual resources:
| Step and Status | Dependency | Dependent on Step | Plan | Actual |
|---|---|---|---|---|
| Step 10 | n/a | n/a | 1 hour | 0.5 hour |
| Step 20 | Start-to-Start | 10 | 8 hours | 4.1 hours |
| Step 30 | Start-to-Start | 20 | 4 hours | 2 hours |
Example 10: Impact of Varying the Initiation of the Backflush Operation
Product 1 has a plan quantity of 100, and 50 are produced. This example shows an initial incremental backflush initiated on Product 1 for 50 percent of plan. Two steps are dependent on step 10. Each step has a different dependency type.Following is a table of the step dependencies, plan resource usage, and actual resource usage:
| Step and Status | Dependency | Dependent on Step | Plan | Actual |
|---|---|---|---|---|
| Step 10 Completed | n/a | n/a | 1 hour | 1 hour |
| Step 20 WIP | Finish-to-Start | 10 | 6 hours | 3 hours |
| Step 30 WIP | Start-to-Start | 10 | 4 hours | 2 hours |
| Step 40 WIP | Start-to-Start | 30 and 20 | 6 hours | 3 hours |
Following is an illustration of the previously tabulated step dependencies, plan resource usage, and actual resource usage:
The impact on actual usage changes depending on the way you initiate the backflush.
-
If the calculation is initiated from the start-to-start path (from step 30), then the actual usage is 0.5 hour.
- If the calculation is initiated from the finish-to-start path (from step 20), then the actual usage is one hour.
Performing Incremental Backflushing
The Incremental Backflushing window lets you drive incremental backflushing on a work in process or completed batch. Enter an incremental quantity, a new actual quantity, or a new percent of planned quantity for an item.By default the transaction created for incremental release items are assigned the current system date. You can specify a transaction date for the incremental backflushing to ensure that all the completed transactions of incremental release items have the date you enter rather than the default system date and time.
Prerequisites
-
Create a batch.
- Ensure batch status is WIP or Completed.
To incrementally backflush a batch:
-
Navigate to the Incremental Backflushing window.
-
Batch displays one of the following:
-
If you access this window from the menu, then query the batch
Document number. If you query a phantom batch, then a message displays
to advise that the batch cannot be found. Phantom batches cannot drive
incremental backflushing, as changes made to phantoms do not directly
affect the parent batch.
- If you access this window from the Batch Details window, then the window displays all batch header information supplied.
-
If you access this window from the menu, then query the batch
Document number. If you query a phantom batch, then a message displays
to advise that the batch cannot be found. Phantom batches cannot drive
incremental backflushing, as changes made to phantoms do not directly
affect the parent batch.
-
The following fields are display only:
-
Status displays the status of the batch. For incremental backflushing, the batch must be WIP or Completed.
-
Product displays the product code for the first product produced by the batch.
-
Recipe displays the code for the recipe used in the batch.
-
Recipe Version displays the recipe version.
-
Formula displays the formula used to produce the batch.
-
Formula Version displays the formula version.
-
Routing displays the routing associated with the batch.
- Routing Version displays the routing version.
-
Status displays the status of the batch. For incremental backflushing, the batch must be WIP or Completed.
-
Item displays the item code driving incremental backflushing.
-
If you access the Incremental Backflushing window from the menu, then enter the Item.
- If you access the window from the Batch Details window, then the Item code, Description, and Line Type display automatically.
-
If you access the Incremental Backflushing window from the menu, then enter the Item.
-
The following fields are display only:
-
Revision displays the item revision.
-
Item Description displays a brief description of the item.
- Line Type displays the type of material as Product, Byproduct, or Ingredient.
-
Revision displays the item revision.
-
Enter one of the following:
-
An incremental quantity in the Incremental Qty field for the UOM displays.
-
A new actual quantity in the New Actual field for the UOM displays.
-
A new percent of the planned quantity in the Percent Plan field. Enter the percent as a whole number. For example, enter five percent as 5.
Based on the field entered, the application calculates the values for the other fields. For example, if you enter a new actual quantity, then the values are calculated for the incremental quantity and percent of planned quantity.
-
An incremental quantity in the Incremental Qty field for the UOM displays.
-
To override entry of the default system date and time for the incremental backflushing operation, enter Transaction Date as the actual date the incremental backflushing is performed. Leave this field blank to enter the current system date and time.
-
The following fields are display only:
-
Line displays the line number of the item in the batch.
-
UOM displays the unit of measure for the quantity fields.
-
Plan Qty displays the planned quantity for the item displayed.
- Old Actual displays any previous actual quantities completed for the item displayed.
-
Line displays the line number of the item in the batch.
-
Click OK. The application performs backflushing by
calculating a new actual quantity for all the items in the batch that
have a consumption/yield type of Incremental:
-
If you access the window from the menu, then the batch is saved automatically.
- If you access the window from the Batch Details window, then the application redisplays the batch where you choose Incremental Backflush from the Actions menu. Edit the calculated actual quantities or enter any additional transactions.
-
If you access the window from the menu, then the batch is saved automatically.
Editing Batch Steps in Production
The Batch Steps window lets you view planned and actual values for start dates, completion dates, step quantities, charges, and due date. The Batch steps window also lets you release, complete, close, or cancel a batch step. In addition, view planned operations, and the status of each batch step. Refer to "Editing Batch Steps" for a complete discussion of the Batch Steps window.Understanding Charges
A charge is defined as one full load of material accommodated in a single pass through the processing equipment. Charge calculations consider the:-
Volume or mass of material processed
-
Processing equipment capacity
- Time required for a single pass through the equipment
Using Operation Charge Step Dependencies
Apply interoperational dependencies to the charges of an upstream operation in a single routing. In the definition of the batch step dependencies defined initially as routing step dependencies, the Apply to Charge indicator takes the defined dependency and applies it to all charges of the dependent step. The dependency type, standard time offset, and maximum time offset are not applied to the operation, but rather to each charge processed in the dependent step.Example
For example, step 10 yields a charge in 100 pound increments. Step 20 consumes that material by-charge in the same increment. The yield at the end of the charge determines the timing for the material. Therefore, define a finish-to-start relationship, and select the Apply to Charge indicator. Step 20 starts its first charge at the end of the first charge for step 10. This functionality applies to users of the Oracle Advanced Supply Chain Planning (ASCP) application. Refer to Oracle Process Manufacturing process planning user's guides for additional information.Calculating Charges for Dependent Steps
The application calculates how much material to process by each batch step, taking into account the step dependencies, and the input and output of material associated with the individual step. This information is used to calculate the number of charges required to satisfy the demand based on the maximum capacity of the selected step.When you change the planned quantity of a material, the application recalculates all dependent quantities in the recipe. An option is available at the routing level to indicate whether step quantities are manually maintained or automatically calculated by the system. The prerequisites of the step quantity calculation are the creation of step dependencies and the association of material to each appropriate step.
Operation charge details are generated each time a batch is created when an operation contains a resource constrained by capacity. To have charges generated, the application must find a resource with a capacity constraint (or, smallest capacity), and must be scaled by-charge. That resource is associated to the charge detail. The resource is defined in the Oracle Process Manufacturing (OPM) Product Development and OPM Process Planning applications.
You cannot modify charge details. When charge details are communicated to Advanced Planing and Scheduling (APS), they are scheduled and the dates return to the OPM Process Execution application. Also returned are firm planned orders with charge details generated by APS. These generated details are recorded in OPM Process Execution.
Sometimes the charges sent to APS are modified in size. This occurs when the synchronization process is run in APS. Synchronization identifies the upstream and downstream events and ensures that the materials are timed correctly to maximize output and minimize downtime. This APS process can decrease the size of charges in a batch to ensure the consuming batch and the charge are both at the same rate.
The charge number is sequential and begins at one and increase by one for each successive charge. The charge quantity is the maximum capacity for the chargeable resource, except for the final charge that is the remainder of the batch step quantity. Refer to theOracle Process Manufacturing Process Planning User's Guide for additional information.
Following are business rules in effect for recording operation charges:
-
Resizing a batch quantity causes various batch step quantities to
change for a resource that is chargeable. If this occurs, then the
charges are recalculated to accommodate the resizing.
-
Rescheduling a batch clears charge detail dates. All customary batch rescheduling rules apply.
- Deletion or replacement of a chargeable resource causes the charges to be removed. You can delete a chargeable resource or you can substitute a resource for a chargeable resource.
To display charge details:
-
Navigate to the Batch Steps window.
-
Query the desired batch number.
-
Choose Charge Details from the Tools menu.
-
The following fields are display only:
-
Batch No is the batch document number.
-
Resources display the individual resources for each batch charge.
-
Step is the step associated to the resource charge.
-
Activity Sequence Number displays the sequence of the activity, to which the chargeable resource belongs.
-
Charge Number is the number of charges required to satisfy the demand based on the maximum capacity of the selected process element.
-
Charge Qty is the quantity of material for the charge.
-
Planned Start is the planned start date and time for the charge.
- Planned Completion is the planned completion date and time for the charge.
-
Batch No is the batch document number.
-
Close the window.
Understanding Activity Factors
An Activity Factor defines the number of times an activity is performed. For example, if a quality test must be performed at the beginning, middle, and end of a mixing time period, then use an Activity Factor of three. Activity Factors are applied to resource usage when planning and calculating resource usage. Set to zero to exclude a particular activity.Setting Up Preferred Sequences for Activities
In many cases, setup times depend on the setup type of a previous activity processed by a given resource. Evaluation of these activities generates a firmed sequence to perform them to minimize the sum of changeover times for the entire cycle. After you define and create activity sequences in APS, they are returned to the source Process Manufacturing instance. When you create these sequences, firm the resource to ensure that the scheduling engine does not move the resource usage.Example
For example, set up a firmed sequence in the activity RUNTIME for resource RES-1 in Batches 1202, 1203, and 1039. The running of that sequence does not change in the plan generated by APS. Once released by APS and returned to APS on a data collection, the values are recorded in OPM Process Execution. There is no visibility to the Firmed Sequence values in OPM Process Execution. Refer to Oracle Process Manufacturing Process Planning User's Guide for additional information.Editing Resource Transactions
The Resource Transactions window lets you enter actual usage for each of the resources used in batch steps. You can only do this for a batch in which Automatic Step Quantity Calculation (ASQC) is not used.Automatic Step Quantity Calculation
Following is an example of calculating actual resource usage:The material from step 10 flows into step 20. The quantity of step 10 is 100 kilograms (kg), and 50 kg of material is added in step 20. The quantity in step 20 is calculated as 150 kg. Resource usage is calculated based on the step quantity and the throughput. If a resource used in step 20 can process 100 kg in one hour, and the scale type selected is Linear, then the resource usage is 1.5 hours.
Planned step quantities and resource usage are calculated when a batch is created, and while the batch and step have a status of Pending. These quantities are updated whenever the material planned quantities are updated. After the batch and step are released and have a status of WIP, the actual step quantity is updated whenever the actual material quantities are updated.
Steps can run for a considerable period of time. Update the actual resource usage based on the progress made through a lengthy step. This allows the planning and scheduling applications to identify there is less remaining resource time required than posted at the start of the step. For example, if a step that takes 1.5 hours is halfway completed, then the planning application recognizes that only 0.75 hours of resource usage remain instead of the full 1.5 hr. Without this information the planning application underestimates the capacity available for other batches. Set the Calculate Interim Resource Usage parameter to YES. With this set, the actual resource usage is updated as the actual step quantity is updated. This decreases the pending resource transactions upon which the Advanced Planning and Scheduling application bases its view of resource availability.
Using the Calculate Interim Resource Usage Parameter
The Calculate Interim Resource Usage parameter functions only with ASQC batches as follows:-
Set to No, it does not update the actual resource usage every time the actual step quantity is updated. Default.
- Set to Yes, it updates the actual resource usage every time the actual step quantity is updated.
Implementation Consideration
If using resources with a scale type of By Charge, then update the actual step quantity in integer multiples of charges to reflect the correct usage.You can use folders with the Resource Transactions window.
See: Oracle E-Business Suite User's Guide
Prerequisites
- Create a batch with a routing.
To enter resource transactions:
-
Navigate to the Resource Transactions window.
-
The following fields are display only:
-
Document displays the batch document number.
-
Status is the batch status.
-
Step displays the batch step number.
-
Step Status displays the status of the step as:
-
Pending for a step that is pending.
-
WIP for a step that is work in process.
-
Completed for a step that is completed.
-
Closed for a step that is closed.
- Canceled for a step that is canceled.
-
Pending for a step that is pending.
-
Operation displays the code for the operation performed in the step.
-
Operation Description displays a brief description of the operation.
-
Activity displays the activity associated to the displayed operation.
-
Activity Description displays a brief description of the activity.
-
Resource displays the resource associated with the activity.
-
Resource Description displays a brief description of the resource.
-
Actual Usage displays the actual resource usage for the batch step. This is the total resource usage of the completed transactions.
- Usage UOM displays the unit of measure for the Actual Usage field.
-
Document displays the batch document number.
-
Enter the Transaction Date. The current date and time is the default if you enter a new transaction.
-
Enter Usage for the resource transaction.
-
Enter the Start Date for the transaction.
-
Enter the End Date for the transaction. If the resource usage is not expressed in time units, then this date defaults to the start date.
-
If the step is sequentially dependent on other steps, then Sequence Dependent is selected.
-
Enter the Instance Number as the specific instance of the resource that performed the transaction.
-
If the resource transaction is completed, then Completed is selected.
-
Enter the Reason associated with the transaction. For
example, LOSS can signify the transaction resulted in an inventory loss
associated with the transaction.
Recording Batch Operation Work in Process
The Batch Operation WIP window lets you report material transferred from step to step. This window is a standalone window, however; data entered here is not used anywhere else in the application. It is not used in calculating step quantities. You cannot edit steps on this window.You can use folders with this window.
See: Oracle E-Business Suite User's Guide
Prerequisites
-
Enter a save a batch.
- Batch status must be work in process.
To record WIP transferred from step to step:
-
Navigate to the Batch Operation WIP window.
-
Query the Batch document number and Batch Step number to edit work in process transfers.
-
Enter the Quantity of material received as a transfer into the Batch Step displayed on this window. Required.
-
Enter the UOM for the material quantity transferred to the Batch Step. Required.
-
Enter the Step Number of the batch step that is the source of the material transfer. Required.
-
Operation Description is a brief description of the operation.
-
Enter the Transaction Date and time of the material transfer. This field defaults to the current system date and time.
-
Enter the Quantity of material sent as a transfer from the Batch Step displayed on this window. Required.
-
Enter the UOM for the material quantity transferred from this batch step. Required.
-
Enter the Step Number of the batch step that is the target of the material transfer. Required.
-
Enter the Transaction Date and time of the material transfer. This field defaults to the current system date and time.
To find a batch operation work in process:
-
Navigate to the Find Batch Operation WIP window.
-
Enter any of the following to narrow your search:
-
Status as Canceled, Pending, WIP, Completed or Closed.
-
Batch as the batch document number.
- Batch Step as the batch step number.
-
Status as Canceled, Pending, WIP, Completed or Closed.
-
Click Find.
No comments:
Post a Comment