Translate

Monday, December 15, 2014

Oracle Standard Pegging

Standard Pegging

The standard pegging process makes two passes through the demands and supplies.

First Pass

The planning engine groups demands into daily windows. It does not use profile option MSO: Demand Window Size. The first window starts at the first demand date and the last window ends at the end of the planning horizon.
For example, the demand window size is 1 day, the first demand is due on day 5. The first demand window is from day 5 to day 5, the second demand window is from day 6 to day 6, and the third demand window is from day 7 to day 7.
Demands in each window are sorted by demand priority in ascending order.
The planning engine groups supplies into daily windows. It does not use profile option MSO: Supply Window Size. The first window starts at the first supply availability date and the last window ends at the end of the planning horizon.
For example, the supply window size is 1 day, the first supply is available on day 7. The first supply window is from day 7 to day 7, the second supply window is from day 8 to day 8, and the third supply window is from day 9 to day 9.
Supplies in each window are sorted by type using the following order:
  1. Firm supplies
    1. On-hand
    2. Receipt shipment, intransit shipment, payback supply (Oracle Project Scheduling)
    3. Work order (firm), job by-product supply (firm), purchase order (firm), non-standard jobs, non-standard job by-product supply (always considered firm)
    4. Purchase requisition (firm)
  2. 2. Existing supplies
    1. Work order (non-firm), job by-product Supply (non-firm), repetitive schedule, repetitive schedule by-product supply, flow schedule, flow schedule by-product supply, purchase order (non-firm)
    2. Purchase requisition (non-firm)
  3. Planned supplies
    1. Planned order (firm), planned order by-product supply (firm). You can raise the pegging priority of firm planned orders by releasing them.
    2. Planned order (non-firm), planned order by-product supply (non-firm)
The supplies in each type are sorted as follows:
  • On-hand: Lot expiration date and then quantity in ascending order to use expiring lots first. A demand pegging to an expiring lot must have its demand date earlier than the lot expiration date; therefore, some expiring lots may not peg.
  • Firm: By date in ascending order within each type.
  • Non-firm: By quantity in ascending order within each type.

Second Pass

The planning engine begins from the first demand window and pegs demands by demand priority to supplies of the first supply window. If necessary, it continues the pegging process with the next supply window.
As all demands in the each demand window are pegged, it moves to the next demand window and pegs as it did in the first demand window
Unpegged supplies are posted to excess.
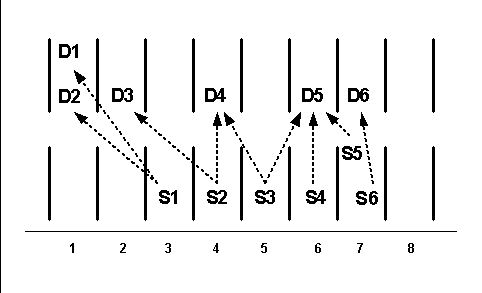
In this example, demands D1 and D2 are sorted by priority in ascending order and supplies S5 and S6 are sorted by type. Pegged entities are connected by arrows.
Pegged Entities
the picture is described in the document text
Standard Pegging Example
This example shows standard pegging for two items. It begins with various settings and then shows the pegging for each item.
Profile option MSC: Use FIFO Pegging is No.
Plan option Peg Supplies by Demand Priority: Cleared.
In standard pegging, the planning engine uses 1 as the value for MSO: Demand Window Size and MSO: Supply Window Size and ignores the entered values.

Item A101 Pegging

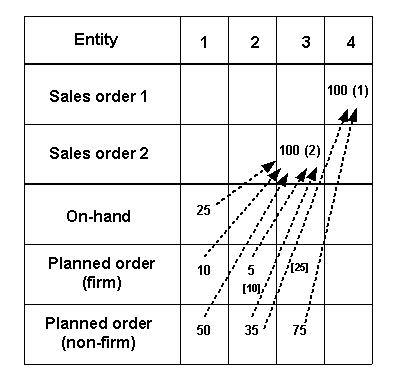
This diagram shows the demands, supplies, and pegging information for item A101. Demand priorities are in parentheses, pegged entities are connected by arrows, and split supply quantities are in brackets.
The first demand window starts on day 3 at the first demand date.
Supplies in the first supply window [day 1] are pegged in the following order:
  • On-hand of quantity 25 on day 1 and demand quantity of 100 on day 3
  • Firm planned order of quantity 10 on day 1 and demand of quantity 100 on day 3
  • Non-firm planned order of quantity 50 on day 1 and demand of quantity 100 on day 3
Supplies in the second supply window [day 2] are pegged in the following order:
  • Firm planned order of quantity 5 on day 2 and demand of quantity 100 on day 3
  • Non-firm planned order of quantity 35 on day 2 (for partial quantity 10) and demand of quantity 100 on day 3
  • Non-firm planned order of quantity 35 on day 2 (for partial quantity 25) and demand of quantity 100 on day 4
Supply in the third supply window [day 3] is pegged as non-firm planned order of quantity 75 on day 3 and demand of quantity 100 on day 4
Pegged Entities
the picture is described in the document text

Wednesday, November 12, 2014

Oracle Gantt Chart Scheduling

Interactive Scheduling Using the Gantt Chart

Interactive scheduling provides a time-phased graphical interface to your plan's scheduled activities and resources to help resolve inevitable shop floor problems. It lets you troubleshoot exceptions arising from resource or material constraints; overloaded or underloaded resources; absenteeism, or machine downtime. Use interactive scheduling to pinpoint affected jobs and operations and simulate changes towards effective, timely resolution.
You can use the Gantt Chart for plan type Constrained.

To access the Gantt Chart

Follow the appropriate navigation path as shown in the table:
Current WindowNavigation
Exception Details window[Select any field] > [right-click] > Gantt Chart
Supply window[Select any field] > [right-click] > Gantt Chart
Resources windowClick the Gantt Chart button
NavigatorSelect a resource>[right-click]>Gantt Chart
Select a resource and click the Gantt chart button and the bottom of the navigator window.
The title in the Gantt Chart window reflects the view selection that you make-- Orders View, Resource Activities View, or Supplier Capacity View.
When the Gantt Chart opens, there are two group boxes.
  • The first group box displays "Gantt Chart" and the instance and organization selected.
    The icons provide options for various Gantt chart views.
    The Preference set determines the user preferences for Gantt chart display options.
    The Go To option enables you to go to a specific date when the Gantt chart is displayed, and the Today option enables you to view the current date.
  • The next group box displays the view that is selected, with a left and a right pane.
    The folder icon enables you to save selected settings.
    The View field enables you to select a view.
The left pane displays a tree structure with multiple columns. The columns are dependant on the view that is selected.
Depending on the view selected, the left pane displays a list of resources, orders, or item suppliers.
To select a view, use the drop down menu in the left pane.
The right pane panels begin at the plan start date. To go to another date, you can:
  • Scroll horizontally
  • Enter a date and time in Go to: and press Enter. To go to today, click Today.

The right panel header also shows the planning granularity that was used for a certain portion of the planning horizon. This is different from the display granularity. For example, you may be viewing the Gantt chart in weekly buckets, but the portion of the planning horizon you are viewing may have been scheduled at the day level of granularity

Tuesday, October 21, 2014

R12 Advanced Supply Chain Planning ASCP Supply Chain Bidirectional Alternate Sourcing or Circular Sourcing Situation

R12 Advanced Supply Chain Planning ASCP Supply Chain Bidirectional Alternate Sourcing or Circular Sourcing Situation and Strategic Network Optimization SNO


Material should be transferred between Org M1 and Org M2 so as to balance any excess inventory at either organization.

USUALLY,  M1 and M2 obtain material from Organization S1 - where it is made - BUT, for some reason S1 is running out of capacity.

So, ASCP needs to check if quantity  is available in M1  and plan a Transfer to M2, since M2 cannot get it from S1,
and vice versa if M1 needs material and cannot get it from S1.

In a Constrained Plan, you could set up Sourcing Rules for M1 with Rank1 Transfer From S1, Rank2 Transfer from M2.
Similarly for M2, Rank1 S1, Rank2 M1.  Will that work, or could it cause unnecessary demand by M1 on M2 and vice versa?

The idea is to oblige M1 and M2 to help each other out if they can, without creating demand that they cannot accommodate.

Does anyone have a suggested approach on how to set this up so that the system is smart enough to do this automagically?


Answer
------
ASCP will not handle circular sourcing unless you are using a DRP plan type which can do inventory rebalancing.  But ASCP/DRP plan
types are not what you would want here.

So I would consider handling it in a couple of ways:

1) Do not plan for this situation, rather handle it manually.  As you said “USUALLY” S1 would supply, so plan for the usual case.
   Manual process is good for exceptions.

2) Run a plan with a sourcing rule that works in one direction only (M2 -> M1).  You can then run another plan with a sourcing
   rule in the opposite direction.  Then compare the results

3) Just a general note and something to keep in mind - if circular sourcing is a true requirement for the customer -  then perhaps
   a consideration could be using ASCP with SNO to refine the sourcing matrix.  SNO can support circular sourcing relationships
   and pass the decisions on to ASCP for tactical planning purposes.  The idea would be to let SNO resolve the relationship then
   pass the sourcing assignment set into ASCP without the circular relationship.

   Basically, If implemented in an integrated manner with ASCP, the sourcing decisions made in SNO can be reflected in the ASCP assignment
   sets, which should remove the overlapping circular sourcing rules when sent into ASCP.  Meaning, SNO can resolve the inventory balancing
   questions at a higher level and your resulting plan would be what Danny mentions in bullet point 2, but time phased.   The assignment
   sets sent back to ASCP would not reflect    the circular sourcing relationship as it would be disabled when and if the other shipping
   direction kicks in.  SNO wouldn’t circular source in the same period, so you’d see time phase assignment sets.
If you have a loop, check out:

Monday, October 20, 2014

Debug in Order Management Shipping Execution

To generate a debug file from the Shipping Transaction or Quick Ship forms:


Note: if executing Pick Release from this form, please refer to B. Pick Release below for additional settings and log file.

1. Following Profile Options need to be set before each test case, then reset after completion:
      OM: Debug Level - set to 5
      WSH: Debug Enabled - set to Yes
2. The following Profile Option once set do not need to be changed.
      WSH: Debug Level - set to Statement
WSH: Debug Log Directory - This profile option may be set at the Site level to any valid directory path. A valid path is any directory that can be written to by the database. To find available paths, run the following SQL statement:
select value from v$parameter where name = 'utl_file_dir'

**If the profile option is set to the same path as OM: Debug Log Directory profile option, the file may be retrieved using the Order Management concurrent request Diagnostic: OM Debug File Retrieval (Order Management responsibility, Reports,Requests > Request > Single Request). .
3. In the Shipping form, go to Tools and check the Debug box. Please make a note of the file name displayed for later retrieval.
4. Perform the action you wish to debug.
5. Go to Tools and uncheck Debug.
6. Provide the debug file from the directory specified in step 3. If the profile options WSH: Debug Log Directory and OM: Debug Log Directory are set to the same value, use the concurrent request Diagnostic: OM Debug File Retrieval (Order Management > Run Requests > Single Request) to retrieve the file. To view the debug and save ( View > Requests > Relevent Request_id (button). Click View Output > Save file as "filename.txt". Provide the "filename.txt" file to Support.
7. Reset profile options in Step 1.

For a short video on creating and retrieving a Shipping Forms Debug, please refer to Document 1358154.1: Diagnostics: WSH Shipping Forms Debugging.


    B. To generate a debug for Pick Release:

1. Following Profile Options need to be set before each test case, then reset after completion:
     OM: Debug Level - set to 5
     WSH: Debug Enabled - set to Yes
     INV: Debug Trace - set to Yes
2. The following Profile Option once set do not need to be changed.
     WSH: Debug Level - set to Statement
     INV: Debug Level - set to 11 >
3. ONLY IF using Warehouse Management (WMS), set the following profile options:
     FND: Debug Log Enabled - set to Yes
     FND: Debug Log Level - set to Statement
     FND: Debug Log Module - set to wms.plsql.%
4. In the Release Sales Order for Picking form go to Tools and check the Debug box.
5. Submit the pick release.
6. Provide the Pick Selection List Generation log file (View > Requests > Find > click on View Log... for the appropriate file), the file displayed in Step 3, the INV: Debug file (if generated) and if using WMS, the FND: Debug Log Filename for Middle-Tier.
7. Reset profile options in Step 1 and if using WMS, Step 3.

For a short video on creating and retrieving a Shipping Forms Debug, please refer to Document 1358164.1: Diagnostics: WSH Pick Release Debug.


    C. To generate a debug for Interface Trip Stop - SRS:

1. Following Profile Options need to be set before each test case, then reset after completion:
     OM: Debug Level - set to 5      WSH: Debug Enabled - set to Yes      INV: Debug Trace - set to Yes
2. The following Profile Option once set do not need to be changed.
     WSH: Debug Level - set to Statement INV: Debug Level - set to 11
3. Set the Debug Level parameter to 1 (Debugging ON)
4. Submit the job.
5. Provide the Interface Trip Stop log file (View > Requests > Find > click on View Log... for the appropriate file).
6. Reset profile options in Step 1.

For a short video on creating and retrieving a Shipping Forms Debug, please refer to Document 1358156.1: Diagnostics: WSH Interface Trip Stops Debug.


    D. To generate a debug for an API:

1. Following Profile Options need to be set before each test case, then reset after completion:
     OM: Debug Level - set to 5
     WSH: Debug Enabled - set to Yes
     INV: Debug Trace - set to Yes
2. The following Profile Option once set do not need to be changed.
     WSH: Debug Level - set to Statement
     INV: Debug Level - set to 11
WSH: Debug Log Directory - This profile option may be set at the Site level to any valid directory path. A valid path is any directory that can be written to by the database. To find available paths, run the following SQL statement:
select value from v$parameter where name = 'utl_file_dir'
**If the profile option is set to the same path as OM: Debug Log Directory profile option, the file may be retrieved using the Order Management concurrent request Diagnostic: OM Debug File Retrieval (Order Management responsibility, Reports,Requests > Request > Single Request). .
3. Add the following line of code in the wrapper script which calls the API:
DECLARE l_file_name VARCHAR2(32767); l_return_status VARCHAR2(32767); l_msg_data VARCHAR2(32767); l_msg_count NUMBER; BEGIN fnd_profile.put('WSH_DEBUG_MODULE','%'); fnd_profile.put('WSH_DEBUG_LEVEL',WSH_DEBUG_SV.C_STMT_LEVEL); wsh_debug_sv.start_debugger(l_file_name,l_return_status,l_msg_data,l_msg_count);
4. Submit the job.
5. Provide the log file.
6. Reset profile options in Step 1.
Versions 11.5.2 to 11.5.8

    E. To generate a debug for Pick Release:

1. Following Profile Options need to be set before each test case, then reset after completion:
     OM: Debug Level - set to 5
     WSH: Debug Enabled - set to Yes
     INV: Debug Trace - set to Yes
2. The following Profile Option once set do not need to be changed.
     WSH: Debug Level - set to Statement
     INV: Debug Level - set to 11
3. In the Release Sales Order for Picking form go to Tools and check the Debug box.
4. Submit the pick release.
5. Provide the Pick Selection List Generation log file (View > Requests > Find > click on View Log... for the appropriate file), the file displayed in Step 3.
6. Reset profile options in Step 1.

    F. To generate a debug for Interface Trip Stop - SRS:

1. Following Profile Options need to be set before each test case, then reset after completion:
     OM: Debug Level - set to 5
     WSH: Debug Enabled - set to Yes
     INV: Debug Trace - set to Yes
2. The following Profile Option once set do not need to be changed.
     WSH: Debug Level - set to Statement
     INV: Debug Level - set to 11
3. Set the Log Level parameter to 1 (Debugging ON)
4. Submit the job.
5. Provide the Interface Trip Stop log file (View > Requests > Find > click on View Log... for the appropriate file).
6. Reset profile options in Step 1.
   G. To generate a debug for an API:

1. Following Profile Options need to be set before each test case, then reset after completion:
     OM: Debug Level - set to 5
     WSH: Debug Enabled - set to Yes
     INV: Debug Trace - set to Yes
2. The following Profile Option once set do not need to be changed.
     WSH: Debug Level - set to Statement
     INV: Debug Level - set to 11
WSH: Debug Log Directory
select value from v$parameter where name = 'utl_file_dir'
3. Add the following line of code in the wrapper script which calls the API:
oe_debug_pub.initialize; oe_debug_pub.SetDebugLevel(5); DBMS_OUTPUT.PUT_LINE('Debug File = ' ||OE_DEBUG_PUB.G_DIR||'/'||OE_DEBUG_PUB.G_FILE);
4. Submit the job.
5. Provide the log file
6. Reset profile options in Step 1.

Order Management Profile Options

Order Management Profile Options
  OM: Charges For Back orders
  OM: Charges for included item
  OM: Charging Privilege
  OM: Credit Memo Transaction Type
  OM: Deactivate Pricing at Scheduling
  OM: Discounting Privileges
  OM: Enable Group pricing for DSP lines
  OM: GSA Discount Violation Action
  OM: Item Change Honors Frozen Price
  OM: Item Flexfield
  OM: List Price Override Privilege
  OM: Negative Pricing
  OM: Over Return Tolerance
  OM: Overshipment Invoice Basis
  OM: Promotion Limit Violation Action
  OM: Return Unfulfilled Referenced Line Action
  OM: Sales Order Form: Refresh Method (Query Coordination)
  OM: Send Changed Lines to Pricing
  OM: Show Discount Details on Invoice
  OM: Under Return Tolerance
  OM:Unit Price Precision Type
  OM: UOM Class for Charge Periodic
  *New Profiles Within  R12
  *OM: Use Materialized View for Items LOV

Advance Pricing Profile Option

Advance Pricing Profile Option 


* QP: Enable Best Price Formula Evaluation
  *QP: E-mail - From Address
  *QP: External Default Pricing Perspective
  *QP: Continuous Price Breaks
  *QP: Inbound XML Messaging Responsibility
  *QP: Internal Default Pricing Perspective
  *QP: Pricing Party Hierarchy Type
  *QP: Pricing Perspective Request Type
  QP: Accumulation Attributes Enabled
  QP: Accrual UOM Class
  QP: Administer Public Queries
  QP: Allow Buckets for Manual Modifiers
  QP: Allow Duplicate Modifiers
  QP: Batch Size for Bulk Import
  QP: Blind Discount Option
  QP: Break UOM Proration Allowed
  QP: Build Attributes Mapping Options
  QP: Consider Manual Linegroup Adjustments
  QP: Cross Order Volume Period1
  QP: Cross Order Volume Period2
  QP: Cross Order Volume Period3
  QP: Custom Sourced
  QP: Custom Ignore Pricing
  QP: Debug
  QP: Denormalize Qualifiers
  QP: Dynamic Sampling Level
  QP: Get Custom Price Customized
  QP: High Volume Order Processing Compliance
  ...Note: Per development, this profile is no longer used in Oracle Applications Release 12.
  QP: Insert Formula Step Values into Temp Table
  QP: Inventory Decimal Precision
  QP: Item Validation Organization
  QP: Licensed for Product
  QP: Limit Exceed Action
  QP: Line Volume UOM Code
  QP: Line Weight UOM Code
  QP: Modifier Find Window - Show records
  QP: Multi-Currency Installed
  Warning: For Multi-Currency Installed
  QP: Multi Currency Usage
  QP: Negative Pricing
  QP: Pattern Search
  QP: Pass Qualifiers to Get_Custom_Price API
  QP: Performance Control
  QP: Price Rounding
  Warning: When QP: Price Rounding profile option is set to Enforce Currency Precision
  QP: Pricing Transaction Entity
  QP: Promotional Limits Installed
  Warning: Once the QP: Promotional Limits Installed profile option is enabled
  QP: Qualify Secondary Price Lists
  QP: Return Manual Discounts
  Warning:With this profile set to No, one may find an automatic modifier is not being applied.
  QP: Satisfied Qualifiers Option
  QP: Security Control
  Warning: For Oracle Applications Release 12 and Security Control
  QP: Security Default Maintain Privilege
  QP: Security Default ViewOnly Privilege
  QP: Selling Price Rounding Options
  QP: Set Request Name
  QP: Source System Code
  QP: Time UOM Conversion
  QP: Unit Price Precision Type
  QP: UTL_HTTP Transfer Timeout
  QP: Valueset Lookup Filter
  QP: Verify GSA Violations


Oracle Database Appliance Offline Configurator

Oracle Database Appliance Offline ConfiguratorIf you have an ODA you have been thru the Oracle Database Appliance configurator. Oracle Also provides an offline version for people to build the configs before even going to build the box.
Just a quick note that if you used the ODA Offline Configurator  V2.1 the files will not work with configurator 2.2
to fix that please add the following to your old config file

#onecommand.params generated by GUI tool
# Configuration information
CONFIGVERSION=2.2.0.0.0

This will allow the 2.1 config file to be loaded into and modified by the 2.2 configurator  

Saturday, September 20, 2014

FRM-92101 errors accompanied by oracle.forms.net.ConnectionException: Connection from new browser window not supported errors


Temp Soulution

Method 2: -nomerge Switch for iexplore.exe
To start a separate session IE8 browser frame, type the following at Start Search, Run command box or in Command Prompt:
iexplore.exe -nomerge


Permanent Solution


Make use of the -nomerge switch parameter for the IE8 executable. With -nomerge switch, which is also triggerable via “New Session” in menu bar, IE8 default behavior will be overridden to start each new browser window in a new, unique and separate frame process, and session.
Tip: -nomerge switch only works on new IE8 browser window/frame, and not new tab.
So, in order to have multiple concurrent logins to a web application, just load a new instance of the IE8 web browser by using one of the following three methods.
Method 1: New Session
In an existing IE8 web browser window, press Alt to reveal and show the menu bar. Go to File drop down menu, and then select New Session.

Method 2: -nomerge Switch for iexplore.exe
To start a separate session IE8 browser frame, type the following at Start Search, Run command box or in Command Prompt:
iexplore.exe -nomerge
Run Unique Session Window in IE8
Tip: You may have to change directory (cd) to %ProgramFiles%\Internet Explorer\ folder if the path is not defined in command prompt and/or Run command box.
Method 3: Modify IE8 Shortcut to Permanently Launch New IE Browser Window in New Session
Right click on the IE8 shortcut (all IE8 shortcuts or icons on desktop, Start Menu, Quick Launch bar or Taskbar that you want it to run as a new instance session have to be changed), and choose Properties from the right click context menu. Then, append -nomerge to the end of the of the program path in “Target” text box at “Shortcut” tab. For example,
“C:\Program Files\Internet Explorer\iexplore.exe” -nomerge
For IE8 shortcuts that automatically open an URL link location directly, the “-nomerge” parameter should come before the URL. For example,
“C:\Program Files\Internet Explorer\iexplore.exe” -nomerge http://hostname:port/forms/frmservlet?

Multiple Session in oracle Application

Open multiple forms in an Oracle apps session

It becomes quite irritating when I open a new form and the previously opened form is closed automatically by Oracle. This can be fixed by unchecking the box “Close Other Forms” from the Tools menu. Once I have seen this option is checked and disabled. What do I do now?

The parameter FND_SINGLE_FORM_INSTANCE is set to 'Y' for the form.
So when the form is called, this parameter is read and hence only one instance 
of the form is allowed.

SOLUTION

(1) Responsibility : Application Developer 
(2) Navigate to Application --> Function
(3) Query for Function corresponding to the form
(4) Click on "Form" tab
(5) Find the parameter with the value FND_SINGLE_FORM_INSTANCE='Y'
(6) Remove this parameter and save

You can see that the check box “Close Other Forms” is disabled. Oracle allows opening multiple forms when this checkbox is unchecked. Since the checkbox is checked and disabled we have no option but open only 1 form at a time. We need to enable the checkbox so that we can open multiple forms simultaneously. How do we do it?
Go through the following steps:
Responsibility: System Administrator
Navigation: Security > Responsibility > Define
Query for the responsibility, UAE HRMS Manager.
On this form you need to exclude a function. Enter the details as given below,
Type: Function
Name: Navigator: Disable Multiform
Save the form
Now go back to UAE HRMS Manager responsibility.
You can now check or un-check the box to open multiple windows simultaneously.


Thursday, September 18, 2014

Purchase order (PO) in Oracle

Steps to create a Purchase order (PO) in Oracle Apps

A Purchase order is a commercial document and first official order issued by the buyer to the supplier, indicating types, quantities, and agreed prices for products or services the supplier will provide to the buyer.
Basically, there are four types of Purchase Orders, viz
Standard Purchase OrderUsed for One-time purchases for goods and services. Here you know the item, price, payment terms an delivery schedule
Planned Purchase OrderCreated when you have long-term agreement with the supplier. You must specify the details of goods and services, payment terms and the tentative delivery schedule
Blanket Purchase AgreementCreated when the details of items and services, payment terms are known but not specific about the delivery schedule
Contract Purchase AgreementCreated when the terms and conditions of a purchase are known but specific goods and services are not.
Let’s create a Standard Purchase Order.
Here, we will Auto Create a Purchase Order based on Approved Requisition.
Navigation: Purchasing>> Auto Create
Enter requisition number and click Find to navigate to Auto Create documents window
Find Requisition lines
Auto Create Document
Select your Requisition Line by ticking the check box next to the Requisition Line
Action:                             Create
Document Type:              Standard PO
Grouping:                        Default
Click Automatic button and click create button in the New Document form. By clicking Automatic button, a standard PO is created based on the details provided in the Purchasing requisition.
You can select Supplier either in the New Document form or in thePurchase Order form
New document
New document
Auto Create to PO
Auto Create to PO
Status represents the status of the document. Incomplete is the default status for all purchase orders until they are submitted for the first time for approval.
Click Shipments button.
Shipment number, Org, Ship-to, UOM, Quantity and Need-by-date are shown by default. These fields can be edited as needed. You can split the lines and can change the ship-to Organization, quantity of items to be shipped and delivery date.
[you can request the supplier to supply some of the quantities to be supplied by the need-by date you provided and rest of the quantities (to the same ship-to address or a different address) to a different need-by-date]
Shipments
Shipments
Click More tab. The default values are generated
Shipments
Shipments
Receipt Close Tolerance (%) determines when this line will close for receiving
Invoice Close Tolerance (%) determines when this line will close for invoicing
Purchase Order has three main close points: Closed for Receiving,Closed for Invoicing (these two relate to a specific line) and Purchase Order itself has a closed status.
The entire order will not close automatically if all the lines are not closed for both receiving and invoicing. A tolerance of 0% indicates that it will close when the total amount received or invoiced equals the amount on the order, whereas a close tolerance of 100% indicates that no receipts or invoices are required for this order, which will close the lines for receiving as soon as the order is approved. Reviewing these default close tolerances on a regular basis is a good idea to ensure orders are properly controlled and closed with minimal intervention by the purchasing agent.
Select an option at Match approval Level
This determines the close point for an order.
2-way determines Purchase Order and Invoice quantities must match with in the tolerance before the corresponding invoice can be paid.
Quantity Billed = Quantity Ordered
Invoice Price = Purchase Order Price
3-way determines Purchase order, receipt, and invoice quantities must match within tolerance before the corresponding invoice can be paid.
Quantity Billed = Quantity Ordered
Invoice Price = Purchase Order Price
Quantity Billed = quantity Received
4-way determines Purchase order, receipt, accepted, and invoice quantities must match within tolerance before the corresponding invoice can be paid.
Quantity Billed = Quantity Ordered
Invoice Price = Purchase Order Price
Quantity Billed = quantity Received
Quantity Billed= Quantity Accepted

Select an Invoice Match Option
The Invoice Match Option determines whether the invoice will be matched to the Receipt or the PO when using 3-Way matching
Select PO when using 2-way and select PO or Receipt for 3-Way.
Enter the Receiving control information by clicking Receiving Controlsbutton
Receiving Controls
Receiving Controls
Enter distributions for the shipments by clicking Distributions button
Distributions
Distributions
Click on More tab. The Requisition number from which this Purchase Order has been created is shown by default.
Distributions
Distributions
Click Terms to enter terms, conditions, and control information for purchase orders.
Terms
Terms
Click Currency button to enter and change currency information
Save your work and click Approve button for Approval process.
Approve Document
Approve Document
Click OK and check the status in the Purchase Order